How to show real-time highlights and shadows clipping in Photoshop
This article is over 12 months old, and may be out of date or no longer relevant.
But you're here anyway, so give it a read see if it still applies to you.
I’ve used Photoshop for years. Decades even. Yikes, showing age there. But for my photography, I tended to use Photoshop for specific things – such as cleaning up or polishing an image as the final step. The bulk of my editing and RAW processing was in Lightroom.
Earlier this year, a mate (and incredibly talented photographer Michael Stringer: check out his exhibition in Ballarat until 20th October 2019) and I were chatting about his experience at a workshop by another talented photographer, Adam Williams. Adam’s Workshop Wizardry full-day session was just what I needed – to help with creativity, help with self-reflection and looking at my own anxiety and depression, and also, of course, learning new skills – specifically editing within Photoshop. It wasn’t just about editing or using a camera, but about creating connection – with the viewer, but also the photographer – and was an enlightening and valuable day.
Sure, I knew how to use Photoshop – at least for my day job – layers, masks, brushes, selections, sure no worries. But from an editing perspective, never really had the right workflow to use (and the reasoning behind “why” it should or could be done that way). The online component of Adam’s workshop has been superb at breaking down the workflow, and finding that reason behind different processes – and it’s been great, and really changed the way I review how I process my images, and has been superbly presented by Adam (thank you, so much).
High level, my workflow now has file management and a (very) basic RAW process in Lightroom – and the rest happens in Photoshop. All of the adjustments, all of the edits, all in Photoshop.
Through editing more and more in Photoshop, I did really start to miss the dynamic highlights and shadows clipping that Lightroom would display in real-time as you made changes to the image. You know, if I were to really push the brightness and see the areas of blown highlights in red, or take it too dark and get solid shadows in blue. All updated with every single edit I make.
Sure, I could always open up the Adobe Camera RAW filter in Photoshop to see where things are up to, but what about real-time feedback as I make a change? As I brush with a new brightness or highlight? As I adjust with a deeper shadow?
A hunt through Photoshop showed no setting to enable this, but a Google search found this really great post on the Adobe forums.
One of the things I’ve really loved about Adam’s Photoshop workflow and education has been his focus on ease of use – so why should I open ACR specifically to see highlights or shadows. One of Adam’s online tutorials is on making Actions in Photoshop – and gives great one-click access to otherwise multi-step and multi-click tasks.
Why not combine the idea from the Adobe forum with the ease of a single-click Action?
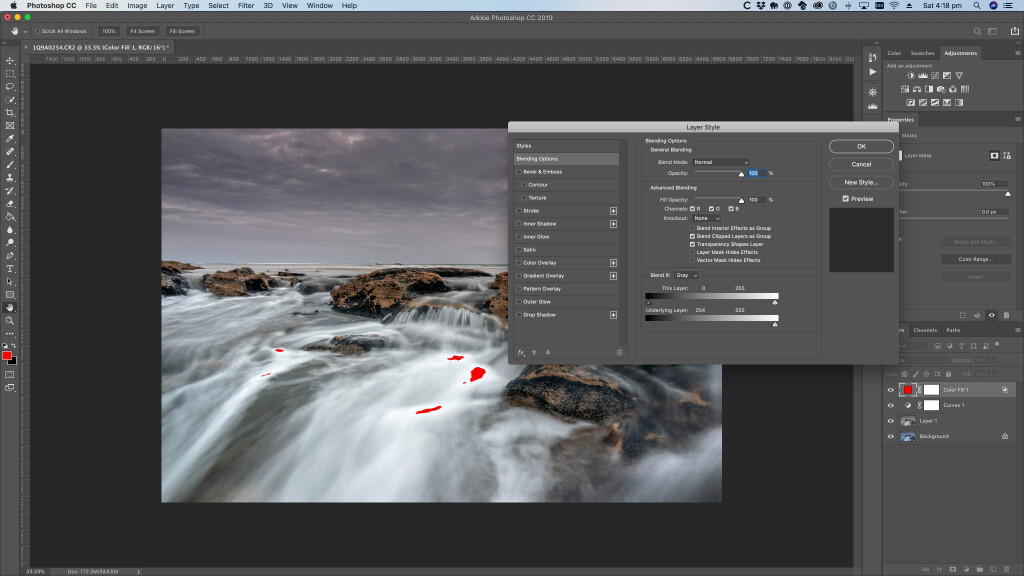
In Photoshop, the basic logic is to have two Solid Color adjustment layers – a red one for highlights and a blue one for shadows. Using the Blend If blending option, we can adjust the “Underlying Layer” setting to only show red if we’re in the very top end of the Blend If scale, and conversely for the shadows.
In other words, only show red if the brightness of the underlying layers fits within the high range (i.e. between 254 and 255). And similarly, only show blue if the brightness of the underlying layers fits within the low range (i.e. between 0 and 2).
We only see red on areas of the image that are really bright. And we only see blue on areas of the image that are really dark. The highlights and the shadows.
Rather than manually creating these two Adjustment Layers on every image, using an Action helps me now do this with a single click. The Action will:
Create the Solid Color layers (and name them appropriately)
Configure them for Shadows and Highlights
Pop them in a neatly named folder.
Yes, 3 steps. But isn’t 3 down to 1 still a great automation improvement?
Now when I move my RAW from Lightroom to Photoshop, as an early part of my workflow, I run this Action to get my shadows and highlights highlighted – and given they’re just Layers, I can turn them on/off as needed.
Sound useful for you too? Take a look at my video to guide you through the setup process. This video does assume a certain level of Photoshop knowledge around actions and keyboard shortcuts, and your layout may appear different and that’s totally fine – the concepts are still the same.
For Shadows, we’re down at the 0 end (i.e. the darkness) and Highlights, up at the 255 end (lightness). We can adjust the Blend If values for each Layer on a case by case basis to adjust the range we want to be triggering for. If we set a Highlight Blend If to be 255, we’ll only see the clipping at the absolute extreme of the highlights – i.e. bright white. If we adjust to 250, for example, we see clipping happen sooner. Which is better? Well, that’s up to you and your image – case by case after all, but at least the initial setup and structure we can build all in one go. Personally, I think closer to the extreme tends to fit nicer (and return less false warnings), but really does depend on your image.
After all, when you’ve blown the highlights (or lost the shadows), they’re gone – and, in my opinion, blown highlights (or murky solid shadows) can really detract from an otherwise gorgeous image.
I do hope that any other Lightroom to Photoshop converts who miss these highlights in their editing find it useful.
Just remember to remove the layers before flattening down your finished edit. Obviously.
Footnote: Sorry, side note, I know I’m Australian and “colour” has a “u” in it, but Photoshop does label it as “Solid Color” so I’ll Americanise myself. For now, at least. See how I used an “s” there. Yeah, had to get that one in. Anyway… continue.